 In this post I will explain what the Swift Benchmark Suite is, why is it useful and how you can contribute to it. The Swift benchmark suite is part of the Swift open source project available on on GitHub.
The Swift team announced on February 8, 2016 that they just open sourced the Swift benchmark suite which wasn’t included in the initial release of the Swift compiler and standard library. In the blog post, it is described that the suite contains “source code for benchmarks, libraries and utilities designed to help track Swift performance and catch performance regressions before they are committed”. The blog post mentions over 75 benchmarks at the time, and today that number has increased to over 150 benchmarks (each defining multiple tests). The suite is well-thought-out and contains various components that can be useful to learn if you plan to contribute with new benchmarks (which is what we’re going to do later!). The benchmark suite contains:
- Libraries providing commonly needed benchmarking functions so you don’t need to reinvent the wheel in every benchmark.
- A driver for running benchmarks, displaying performance metrics and estimate how many times each benchmark should be ran to get a good statistical result.
- A utility for comparing benchmark metrics across Swift versions.
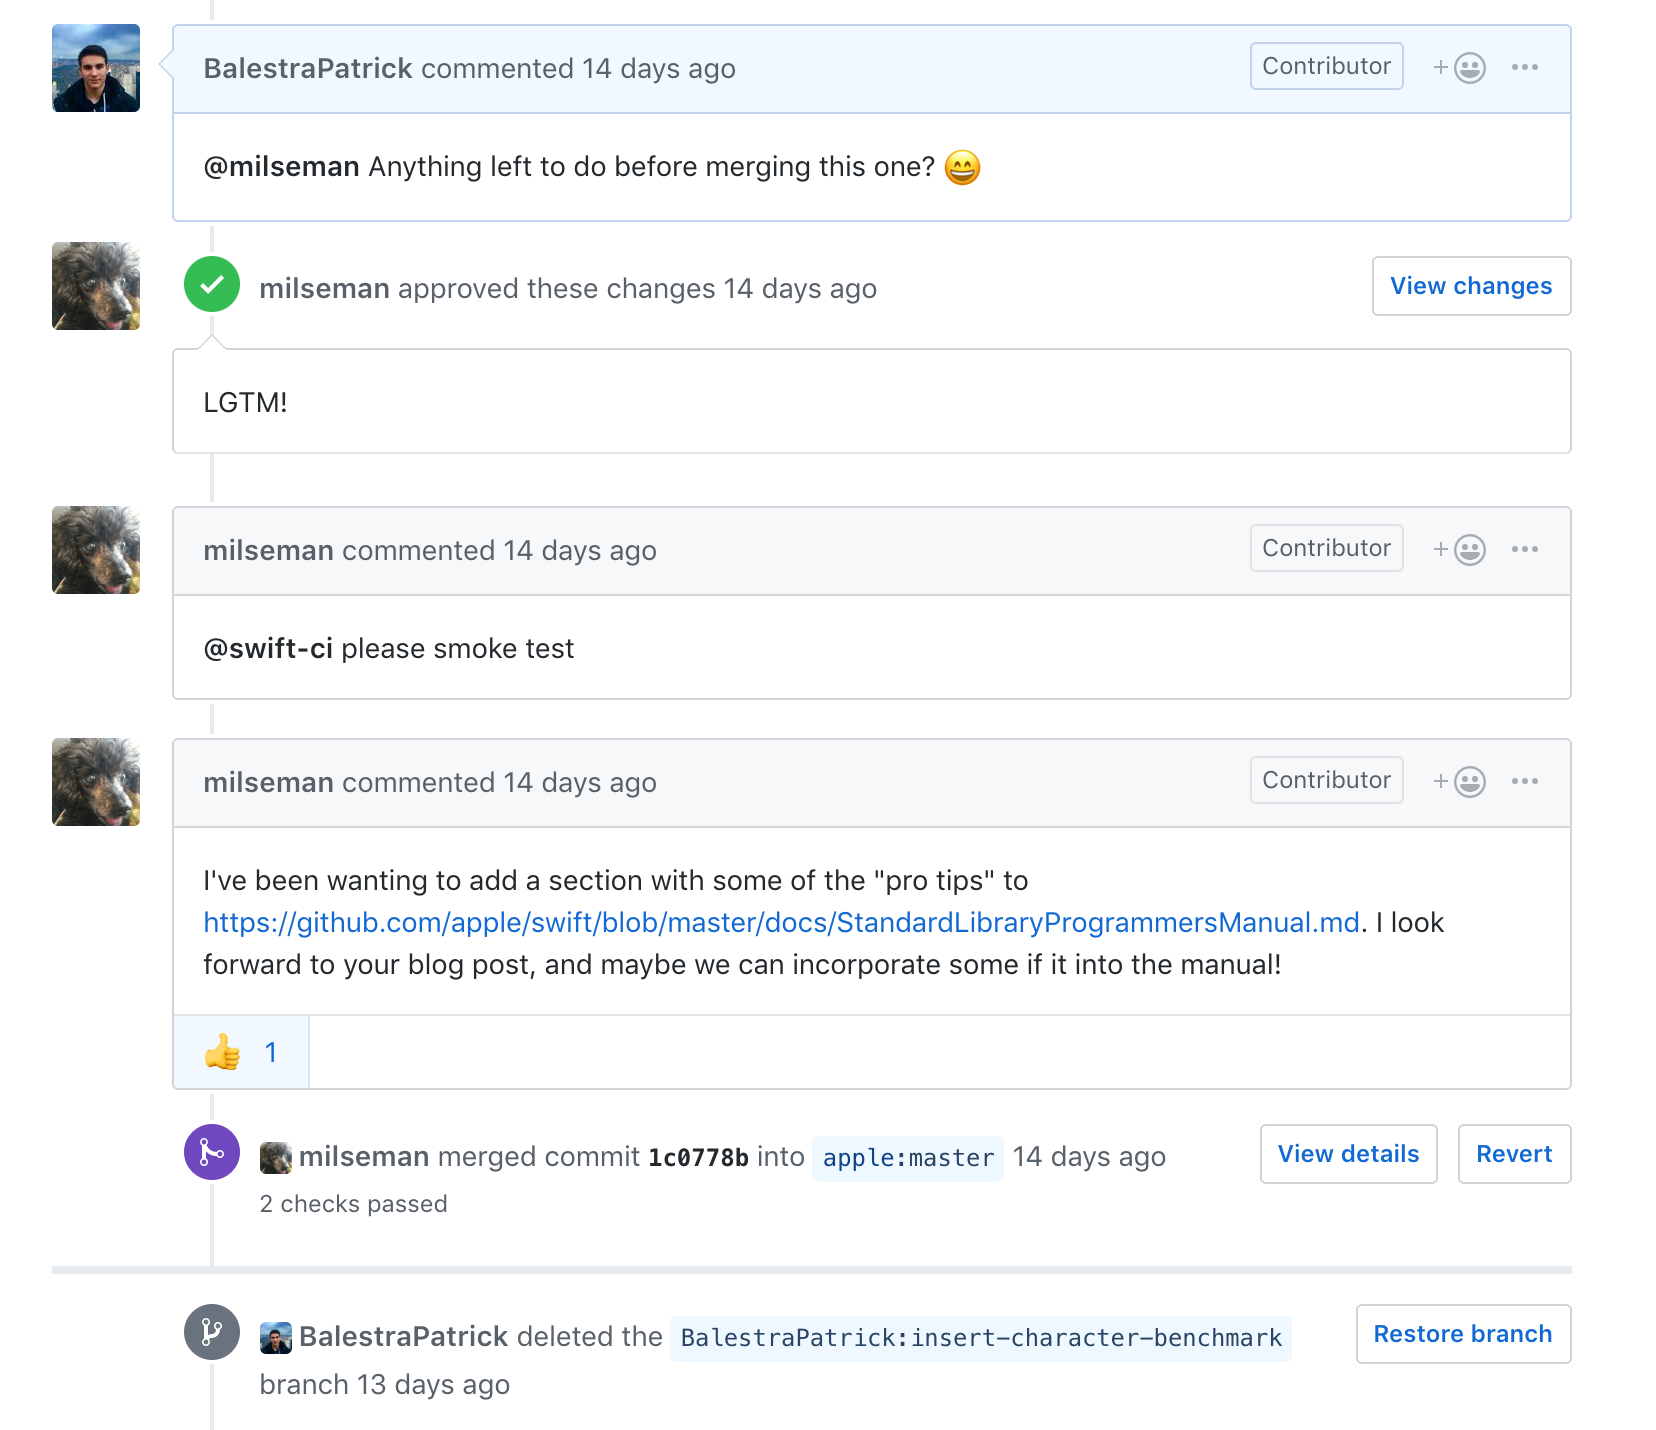
The benchmark suite is integrated with the swift-ci GitHub bot that is used in the Swift project to perform many useful actions in pull requests. When a PR is opened, a Swift team member may comment with the command @swift-ci please benchmark. This will start a build on Jenkins that runs the benchmarks and comments the PR with the results.
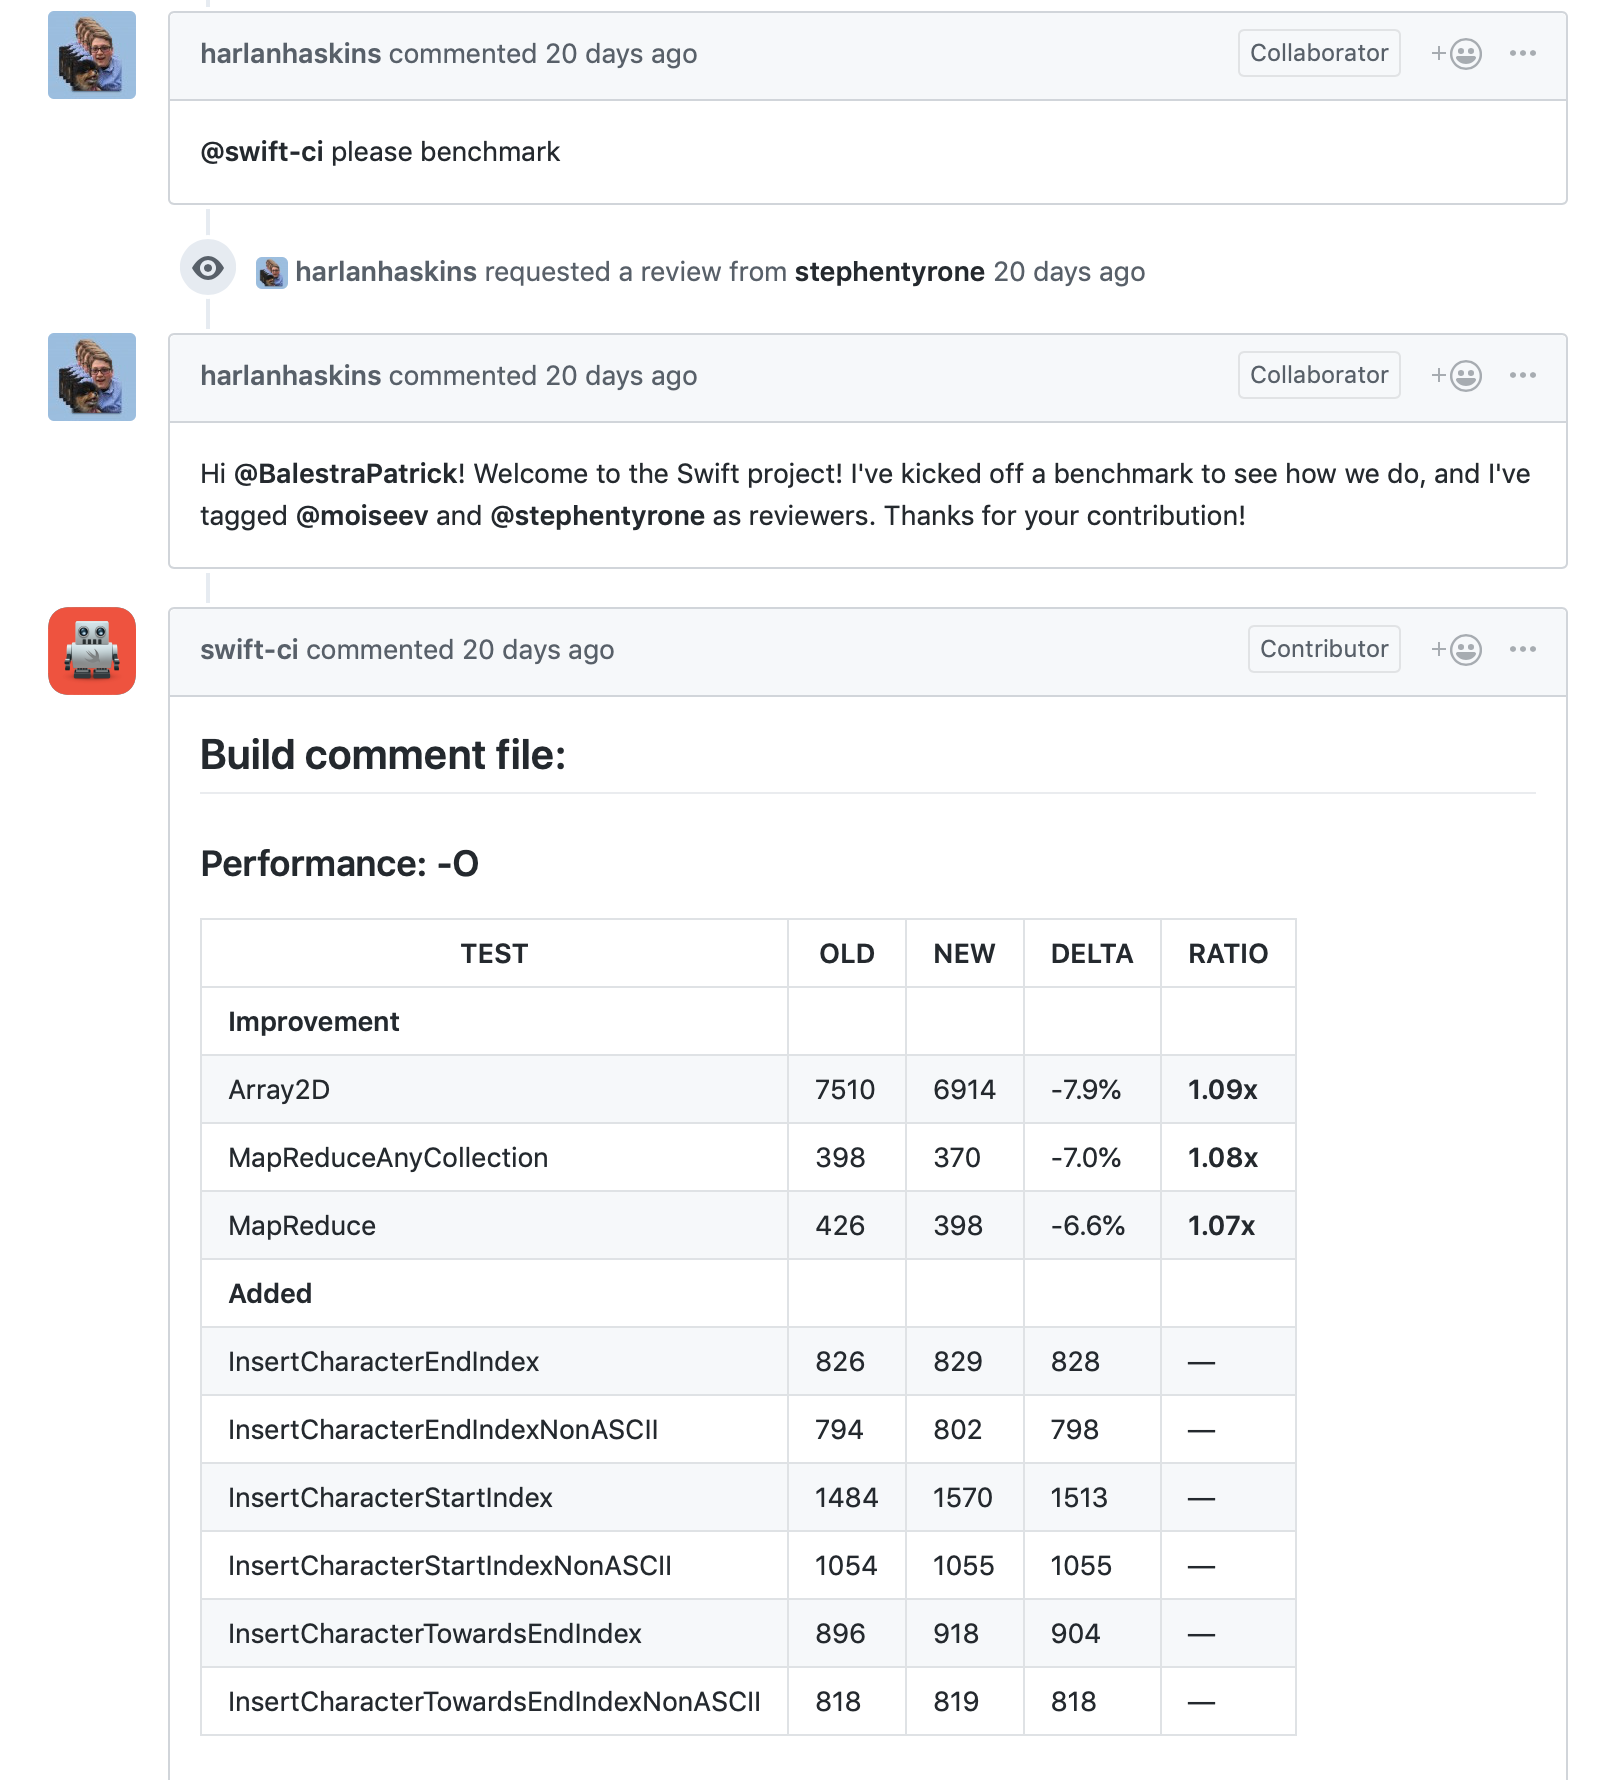 The typical workflow of merging a PR to the Swift project.
Getting Started
The main README in the repository is pretty short and links to external resources such as the Contributing Guide on swift.org. The README in the swift directory is a very good and straightforward guide on how to get started with the project. You can follow the guide there but I will report the main steps here too:
- Install
cmakeandninjawhich are used to compile pretty much everything in the Swift repo.brew install cmake ninja - Create a directory to clone the whole Swift project into it.
mkdir swift-source cd swift-source - Clone the repo and invoke the built-in script that completes the checkout.
git clone git@github.com:apple/swift.git
./swift/utils/update-checkout --clone-with-ssh
You’re done, that was easy! You should now have the full Swift source code in the swift-source folder. The folder itself is about 2GB in size, but if you plan to work on it, make sure you to have a lot more free space. 😅
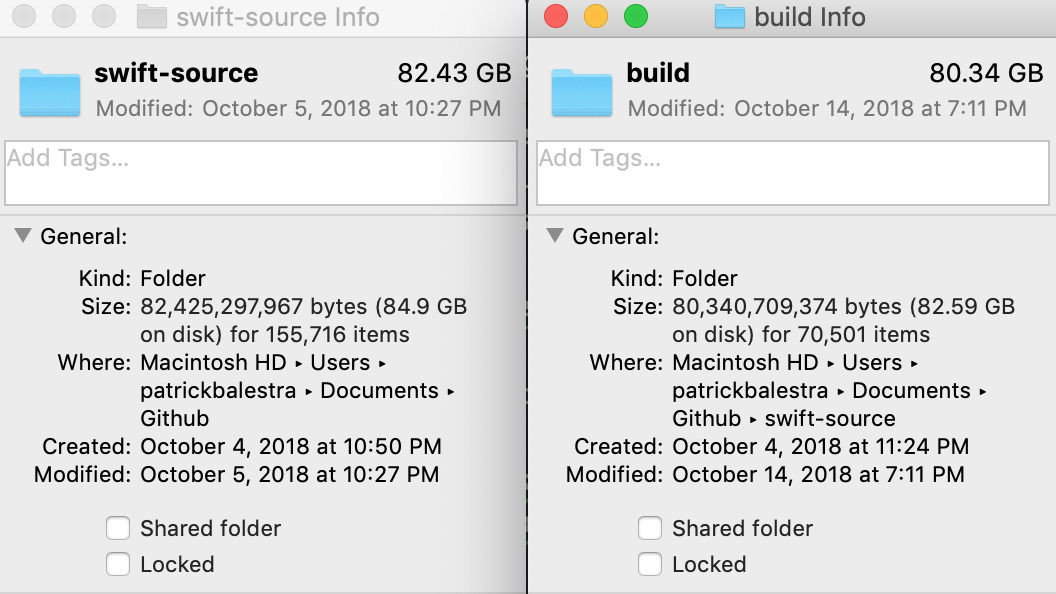 Make sure to clean the build folder every so often.
Building Swift
Swift contains a build-script that can compile different parts of the project. You can choose between using Xcode or Ninja as the build system. I went with ninja since I wanted to get familiar with it. To compile a release build with debug info (which will take a ton of space on your machine), run the following command:
utils/build-script --release-debuginfo
The are many flags that can be used to compile different configurations supported by the build script. You can list all the available arguments by passing the -h flag to the build script. Building the project in debug mode will take longer and the execution time will be impacted as well. This is why a release build is used to benchmark Swift code.
The documentation suggests to perform a full build right after cloning the project, to verify that everything is set up correctly. Make sure you have a charger nearby before starting the build. The first time I started the build, I decided to leave my Mac building with 60% battery left while going for dinner only to discover that it was out of battery less than 20 minutes later.
String Benchmark Gaps
Michael Ilseman tweeted a couple of weeks ago about a new set of starter bugs in the standard library. SR-8905 includes a pretty thorough description of the gaps in the String benchmarks with some advices on where to look to address the problems. At the moment of writing, all gaps are still open for volunteers except the one I fixed which I describe in this post. To start a task, create a new JIRA bug with the title and description of which String method you would like to benchmark. Assign it to yourself and comment back on the main issue to make sure other people don’t start the same task. This is what I did with SR-8908. Having a separate task that tracks a subset of the work is very useful to ask for help too. Simply ping an Apple engineer who works on that specific area and he or she will be happy to guide you through the process. Michael Ilsman helped me a lot in understanding type of benchmarks expected to be written in the suite. He was also kind enough to provide some tips he had to iterate faster when writing benchmarks and more details that helped me understand each built-in function.
After creating the bug and assigning it to yourself in the Swift JIRA, it’s time to dive into the Swift standard library source code. 🛠
Browsing the project
If you have cloned the repo correctly as instructed before, you will now see a swift folder. Inside it, you can see the stdlib folder that contains the standard library source code. It’s a good idea to take a look at the different folders and see how the project is structured. The area of the project where we will focus in this post is the benchmark folder, which contains the benchmark suite of the standard library.
Most of the benchmarks can be found in the single-source folder. Here you will find over 150 files at the time of writing, that benchmark many standard library types and methods to monitor the performance and catch regressions. The scripts that are responsible to run all the benchmarks are inside the scripts folder and are written in Python. Some skeleton files used to register all benchmarks are defined inside the utils folder, such as the main.swift file.
How a benchmark is defined
Benchmarks are usually defined as a single operation that can be executed multiple times in order to get a good and confident statistical value. Once the value is obtained for every benchmark, they are compared with historical values in order to understand the effect of changes in the standard library source code. As a pure example, let’s imagine that a big refactor of the sorting algorithm needs to happen. A very good starting point would be to make sure that there’s a benchmark for it in order to assess the difference in execution time before and after the refactor. The suite is a set of micro benchmarks which should be executed fairly quickly. Every benchmark should thus target an execution time of around 1000 microseconds (1 ms). As explained by Pavol Vaskovic, longer runtimes accumulate measurement errors due to context switching between processes by OS scheduler.
Defining a new benchmark
As mentioned earlier, it’s a good idea to perform a full build after the first clone. There is one small change that you need to do to the previously mentioned command to build the standard library. Each benchmark must be executed against a release build of Swift to get the real execution time. You need to build the standard library without assertions, which you can do by appending the --no-swift-stdlib-assertions flag:
./swift/utils/build-script --release-debuginfo --no-swift-stdlib-assertions
Defining a new benchmark is explained in the README of the benchmark directory. There are two types of test that can be added: single file and multiple files tests. There aren’t many multiple files tests defined in the multi-source directory, so I think most tests are supposed to be single source.
There are a few very simple steps in order to have a new benchmark registered with the benchmark driver and automatically be executed when running the benchmark suite:
-
Add a new Swift file to the
single-sourcefolder named according to the benchmark you’re about to write. We will worry about its contents later. -
Add the path to the new file in
CMakeLists.txt. Make sure to insert the new file name in the right position since all the tests are listed in alphabetical order.
#===-----------------------------------------------------------------------===#
# Declarative Description of Benchmarks
#===-----------------------------------------------------------------------===#

set(SWIFT_BENCH_MODULES
    ...
    single-source/InsertCharacter
    ...
)
- Open
main.swiftin theutilsdirectory and import the new file (which is compiled as a module) and register the benchmark with the driver, which is a fancy way of saying adding it to the internal array of benchmarks 🤪:
// This is just a driver for performance overview tests.

// more imports...
import InsertCharacter

// more benchmark registration...
registerBenchmark(InsertCharacter)
This was a rather manual and error-prone process, maybe you could turn this into new starter bug? 😏
Let’s now get into the interesting stuff: how to write a benchmark.
Writing a benchmark
The README provides a template that is a good starting point. I simply pasted it into a new file named InsertCharacter.swift and replaced “YourTestName” with “InsertCharacter” in my case.
// YourTestName benchmark
//
// rdar://problem/00000000
import TestsUtils

public let YourTestName = BenchmarkInfo(
  name: "YourTestName",
  runFunction: run_YourTestName,
  tags: [.regression])

@inline(never)
public func run_YourTestName(N: Int) {
  // Declare variables

  for i in 1...N {
    // Perform work

    // Verify work was done; break otherwise
  }

  // Assert with CheckResults that work was done
}
First of all, many benchmarks start with the Apple copyright header (not reported here for brevity) and with a simple description of the benchmark and a link to the relative radar or JIRA bug. The TestUtils module (found in benchmark/utils/) is imported which contains useful functions and data types such as benchmark categories and test functions like:
CheckResults: allows to assert the result of an operationblackHole: an@inline(never)function which does nothingidentity: an@inline(never)function which simply returns its parameter)
One interesting point to keep in mind is that the TestUtils and the benchmark files are defined in two different modules. In this way, if the benchmark calls an utility function defined in TestUtils, it will prevent the optimizer to optimize the operation we’re trying to benchmark.
Continuing with the code in the template, we define one or more tests, the name of the associated function that defines the benchmark and an array of tags. Tags can be used to group benchmarks together and run them easily through the benchmark driver (i.e: run all the Codable benchmarks).
The benchmark is then implemented in a function that starts with “run” for convention. The function takes a parameter N of type Int which is estimated by the benchmark driver. The driver first runs the benchmark with N = 1 and estimates how many times it can run the benchmark in one second. This is why the benchmark should be fast and ideally run in a few milliseconds. The driver will then invoke the benchmark with the estimated value in the future and compare the execution time in order to catch regressions.
The file defining the benchmark is a pure Swift file and can contain global variables (such as data structures used in multiple benchmarks) as well as utility functions.
String benchmarks
I decided to take on the task of writing the first benchmarks for insert(_:character). I started by reading the documentation of the method and making sure I understood its complexity when inserting a character at different positions. Starting Swift 4, String is now a collection again and many methods are shared between Array and String for example.
I asked for clarification in the JIRA bug to make sure that what the benchmarks that I was about to write were meaningful and correct. Michael suggested a few tweaks and improvements to make sure the benchmarks would be linear on the input parameter estimated by the driver and that the optimizer wouldn’t optimize the insertions of the same character multiple times.
I decided to write 3 benchmarks with 2 variants, for a total of 6 benchmarks. Let’s take a closer look at their implementation:
insertAtStartIndexis benchmarked with an ASCII and non-ASCII character parameter. It inserts a character at the beginning of the string. Since the insertion of a character at the front requires all subsequent characters to be shifted in memory, the complexity of this benchmark would be O(n²). The benchmark driver estimates the number of times each benchmark has to be executed to get a good statistical value, so having a benchmark with non-linear complexity isn’t a good idea. This was the most challenging benchmark to write and with Michael’s suggestion, the solution it to wrap the quadratic loop in a linear loop. By doing that, the quadratic operation is executed a linear amount of times which allows the driver to estimate the total number of iterations the benchmark should perform.
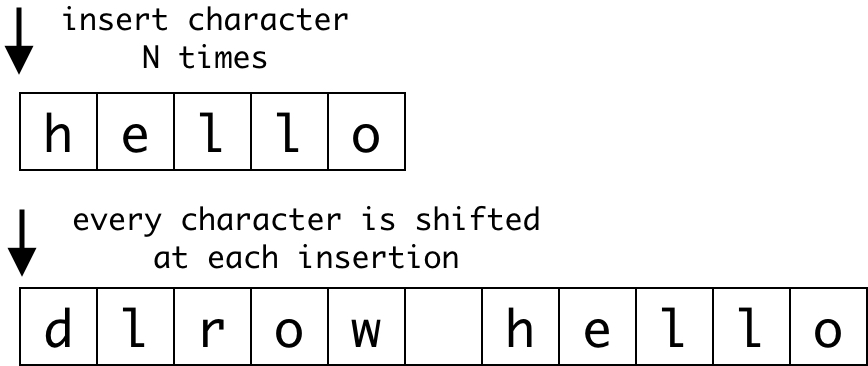 A visualization of inserting a character at the start of the string.
// Insert at start index
@inline(__always)
func insertAtStartIndex(_ c: Character, in string: String, count: Int, insertions: Int) {
var workload = str
for _ in 0..<count {
for _ in 0..<insertions {
workload.insert(identity(c), at: workload.startIndex)
}
workload = str
}
blackHole(workload)
}
@inline(never)
func run_InsertCharacterStartIndex(_ N: Int) {
insertAtStartIndex("w", in: str, count: N * 75, insertions: 50)
}
@inline(never)
func run_InsertCharacterStartIndexNonASCII(_ N: Int) {
insertAtStartIndex("👩🏾🏫", in: str, count: N * 75, insertions: 25)
}
insertAtEndIndexis benchmarked with an ASCII and non-ASCII character parameter. It inserts a character atendIndexwhich should be a O(1) operation (equal toappend). You may think that this benchmark is useless, but in my opinion it’s still a good idea to have it to make sure the performance of inserting a character at the end of aStringdoesn’t deviate from simply appending an element to a genericArray.
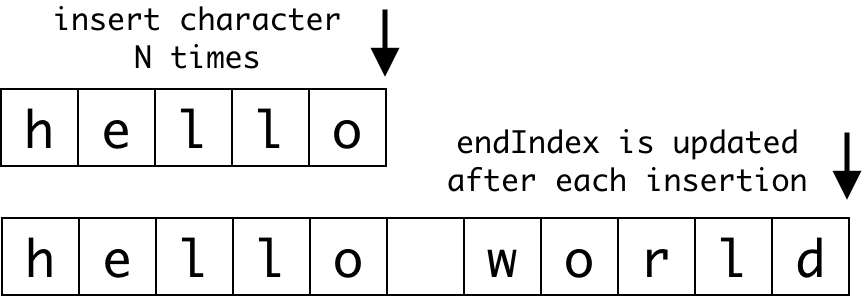 A visualization of inserting a character at the end of the string.
// Insert at end index
@inline(__always)
func insertAtEndIndex(_ c: Character, in string: String, count: Int) {
var workload = string
for _ in 0..<count {
workload.insert(identity(c), at: workload.endIndex)
}
blackHole(workload)
}
@inline(never)
func run_InsertCharacterEndIndex(_ N: Int) {
insertAtEndIndex("s", in: str, count: N * 3000)
}
@inline(never)
func run_InsertCharacterEndIndexNonASCII(_ N: Int) {
insertAtEndIndex("👩🏾🏫", in: str, count: N * 1000)
}
insertTowardsEndIndexis benchmarked with an ASCII and non-ASCII character parameter. The function inserts a character at the initialendIndexas many times as the estimated parameter. Every 1000 insertions, theendIndexis updated and the next characters are inserted at the newendIndex.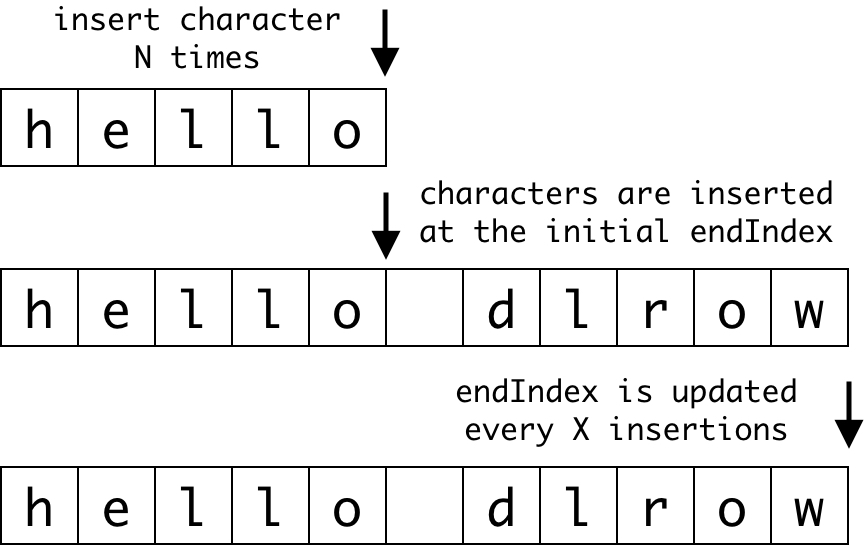 A visualization of inserting a character close to the end of the string.
// Insert towards end index
@inline(__always)
func insertTowardsEndIndex(_ c: Character, in string: String, count: Int) {
var workload = string
var index = workload.endIndex
for i in 0..<count {
workload.insert(identity(c), at: index)
if i % 1000 == 0 {
index = workload.endIndex
}
}
blackHole(workload)
}
@inline(never)
func run_InsertCharacterTowardsEndIndex(_ N: Int) {
insertTowardsEndIndex("s", in: str, count: N * 3000)
}
@inline(never)
func run_InsertCharacterTowardsEndIndexNonASCII(_ N: Int) {
insertTowardsEndIndex("👩🏼💻", in: str, count: N * 1000)
}
As you can see, the common logic between the two tests is abstracted away in an always-inlineable function which accepts different parameters. If we want to insert an ASCII or non-ASCII character, we can simply pass in a different character instead of duplicating the code. The @inline(__always) attribute tells the optimizer to always replace the function call with the implementation. If you want to read more about this attribute, check this out.
Faster iterations
I was interested in seeing if there was a way to run benchmarks without the needs of recompiling the suite again (which can take some time). Michael suggested to abstract the code into a separate executable and re-implement some of the helper functions that the benchmark suite provides. This setup doesn’t exactly represent the real scenario since the source code is compiled into a single module instead of using functions from another module to prevent optimizations. The following code snippet is what I used to iterate faster on String benchmarks based on Michael’s snippet shared as a gist.
import Dispatch

print("start")

public var i = 0

@inline(never)
public func blackHole(_ x: Bool) {
  i += x ? 1 : 0
}
@inline(never)
public func blackHole<C: Collection>(_ x: C) {
  i += x.isEmpty ? 1 : 0
}
@inline(never)
public func blackHole<T>(_ x: UnsafeMutablePointer<T>) {
  i += UInt(bitPattern: x) % 2 == 0 ? 1 : 0
}

@inline(never)
public func CheckResults(_ x: Bool) {
  guard x else { fatalError() }
}

@inline(never)
public func identity<T>(_ x: T) -> T {
  return x
}

func time<T>(_ _caller : String = #function, _ block: () -> T) -> T {
  let start = DispatchTime.now()
  let res = block()
  let end = DispatchTime.now()
  let milliseconds = (end.uptimeNanoseconds - start.uptimeNanoseconds) / 1_000_000
  print("\(_caller)\t\(milliseconds)")
  return res
}


print("Running...")

time("Benchmark name here") {
  // run_YourBenchmarkFunctionNameHere
}
I suggest using CodeRunner which I recently discovered to quickly run your code if you want to iterate faster when writing new benchmarks.
Profiling with Instruments
After abstracting a benchmark into a single file, it’s much easier to profile it with Instruments too. To profile a benchmark, you can first compile it and then invoke Instruments by specifying the template that you would like to use.
swiftc -O benchmarks.swift && instruments -t "Time Profiler" ./benchmarks
Instruments executes the Swift binary and produces a .trace file that can be opened in Instruments to visualize the information captured.
Initially, I was using the CheckResults function to assert that the benchmark was performing the right amount of work. This assertion required to invoke the count method (which is a O(n) operation) on a very long string at the end of the benchmark. I was able to track down that ~2-3% of the total time of the benchmark was spent doing this operation. Since this is not a unit test but rather a benchmark, I decided to remove all CheckResults in order to spend 100% of the time in executing the operation we’re benchmarking. As you can see in the following screenshot, the count method takes 1.3% of the benchmark time in this case.
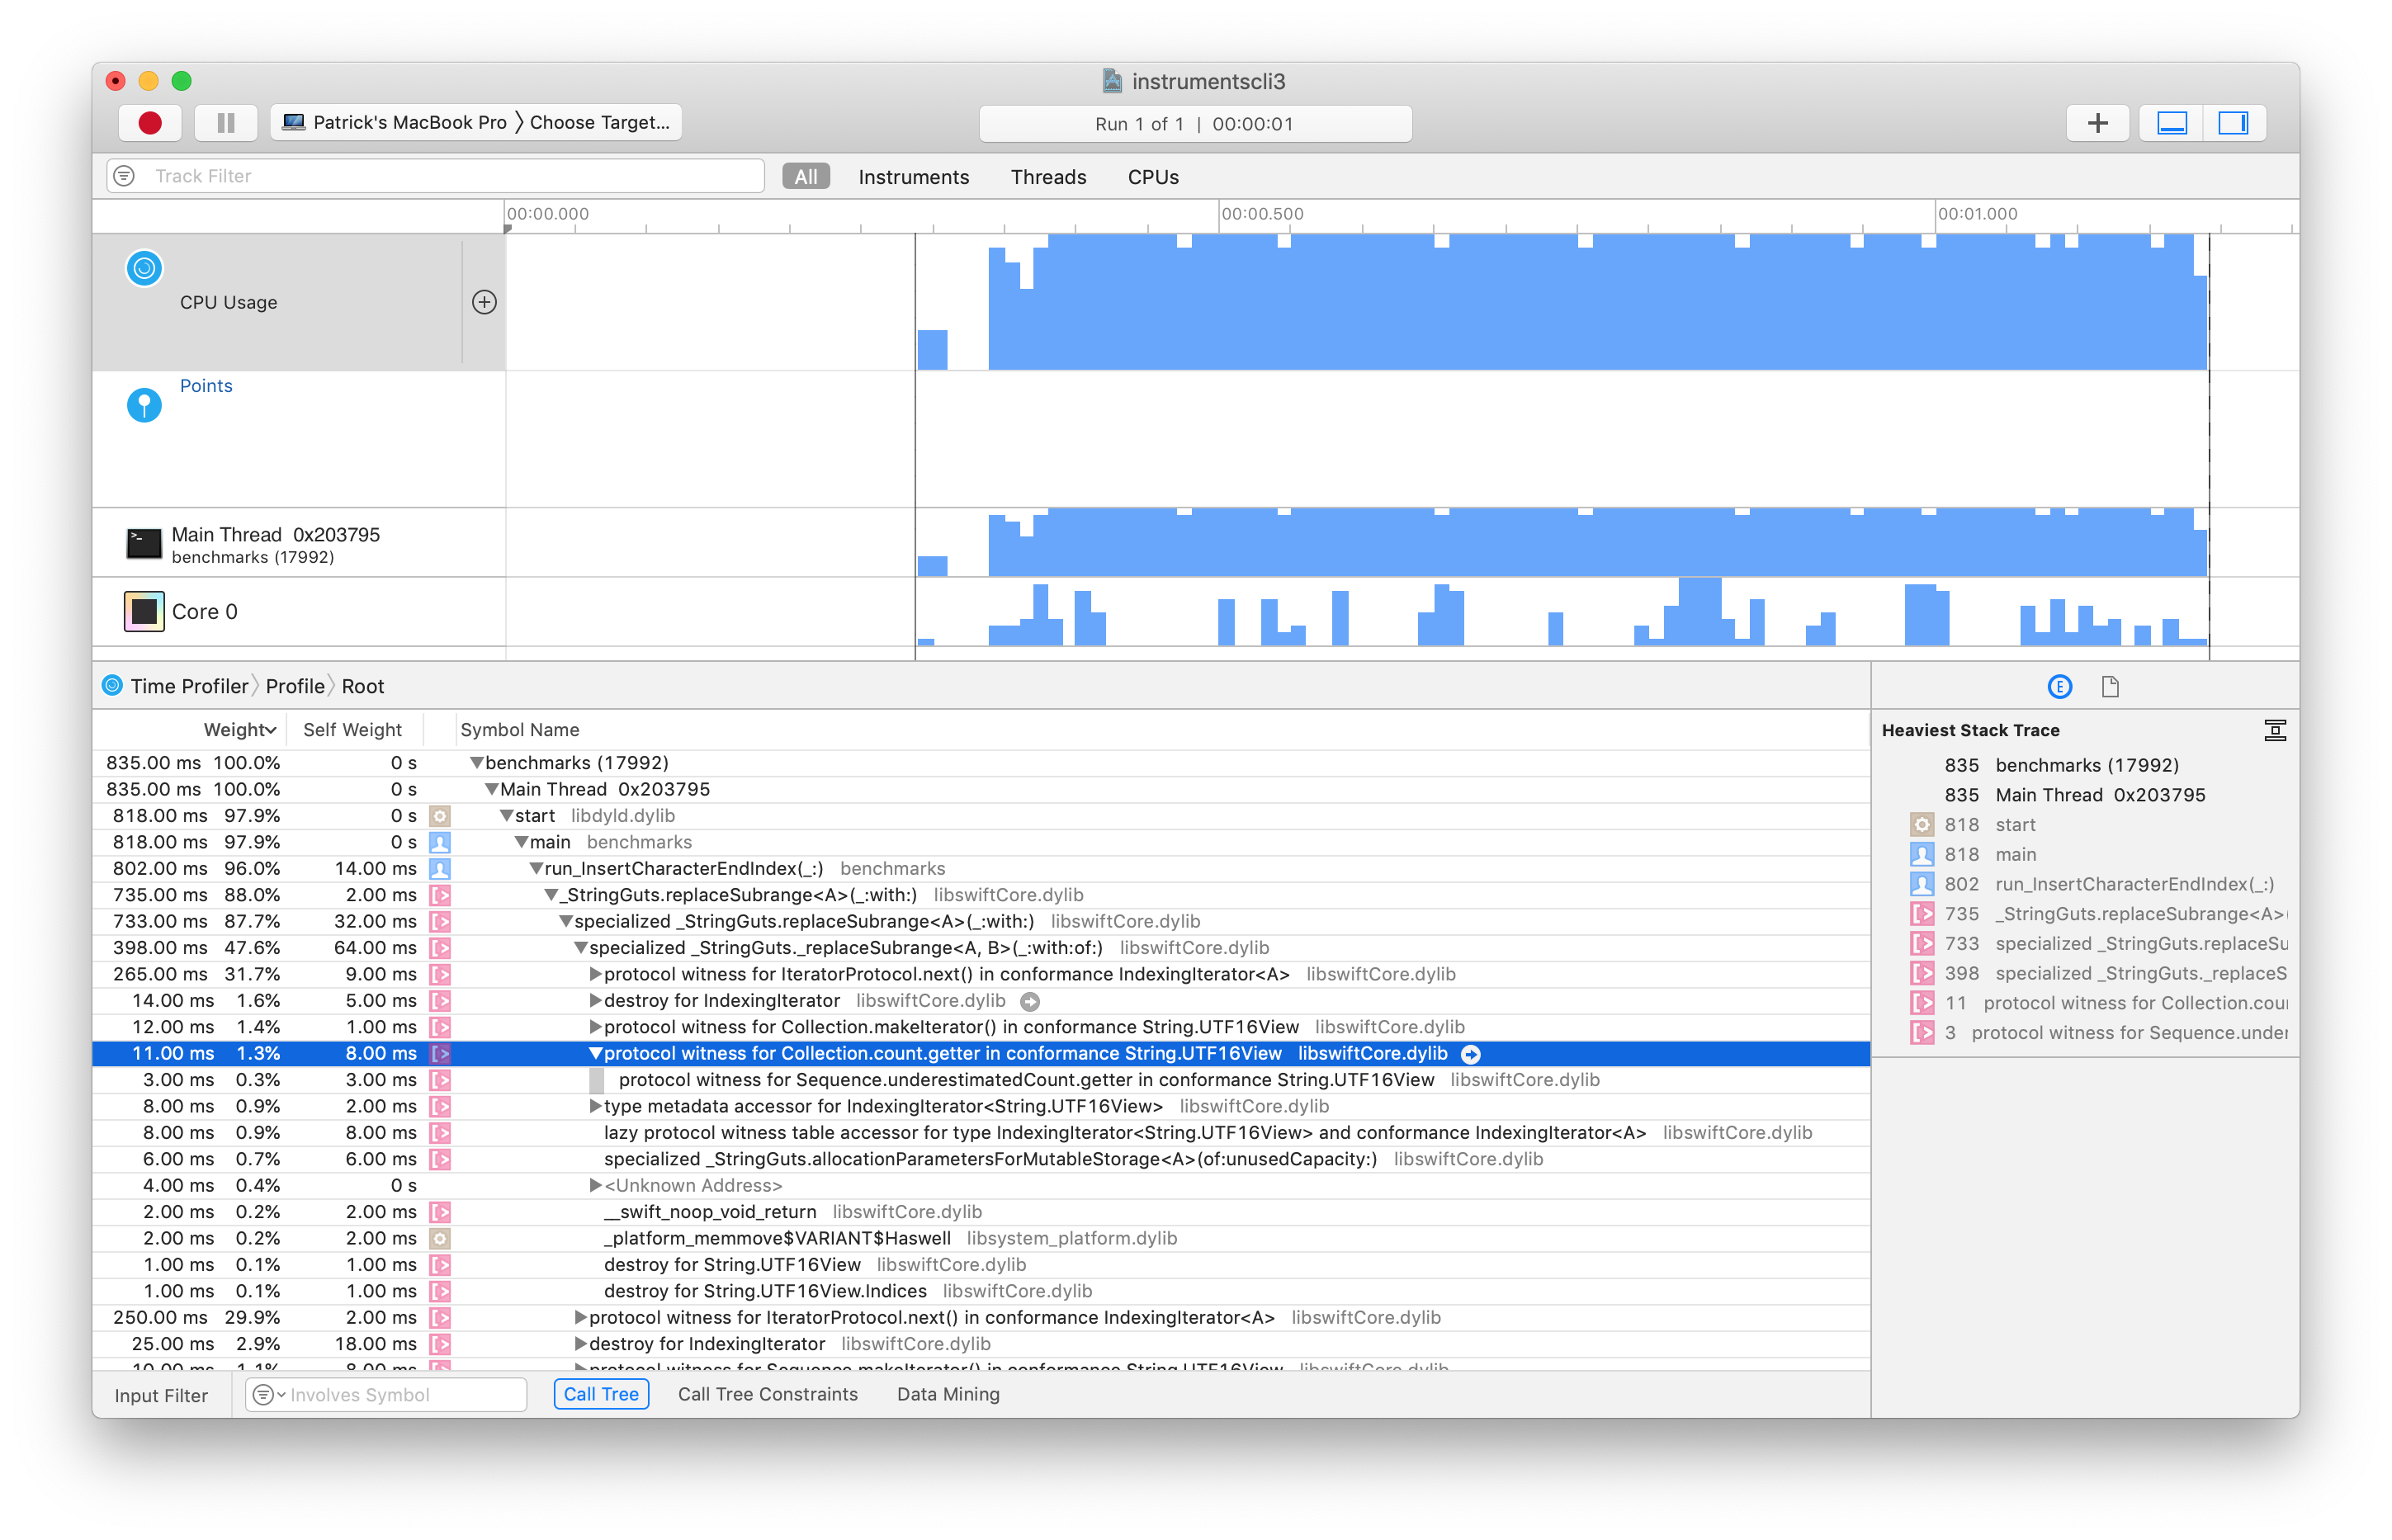 Trace generated by running the time profiler on a benchmark.
Executing a benchmark
We can now use the benchmark driver to run our tests (or only a subset too!). This part took me a while to figure out since some commands didn’t work for me or I was executing them in the wrong directories.
After the compilation has finished successfully, a build folder should appear at the root of the project. It contains a different folder for every configuration that you have built, which is handy if you want to experiment in parallel with different build configurations. You should see a Ninja-RelWithDebInfo folder which contains the artifacts of the compilation. You may need to recompile the project again to have your new benchmark show up in it. Inside the folder you’ll notice three other folders, one for each product that was compiled. We are interested in swift-macosx-x86_64. Take a look at the bin directory which contains many executables. Let’s try to run the benchmark driver in the following way:
./bin/Benchmark_O
The driver will start to execute every test one by one and report the recorded values along with their names. The logs are printed in a CSV format, which should make it very easy to create graphs to visualize the data over time (maybe it’s already used internally by the Swift team?).
#,TEST,SAMPLES,MIN(μs),MAX(μs),MEAN(μs),SD(μs),MEDIAN(μs)
2,AngryPhonebook,1,3415,3415,3415,0,3415
3,AnyHashableWithAClass,1,91148,91148,91148,0,91148
...
Launching the driver directly is useful if you want to run all the 650+ benchmarks, but hopefully you want to save some CPU cycles. Passing the -h flag to the driver will show all the comands that are supported, such as --list, which will simply print all available benchmarks.
$ ./bin/Benchmark_O --list
#,Test,[Tags]
2,AngryPhonebook,[String, api, validation]
3,AnyHashableWithAClass,[abstraction, cpubench, runtime]
4,Array2D,[Array, api, validation]
...
Every benchmark can be referenced by its identifier (show in the # column). Keep in mind that this number can change when adding/removing benchmarks, since it’s simply the index of the benchmark in the array. By listing all the benchmarks you can quickly verify that your new benchmark is correctly registered. You can then take note of the test that you will be working on to run it directly with the --run flag:
$ ./bin/Benchmark_O run 332 333 334 335 336 337
#,TEST,SAMPLES,MIN(μs),MAX(μs),MEAN(μs),SD(μs),MEDIAN(μs)
332,InsertCharacterEndIndex,1,985,985,985,0,985
333,InsertCharacterEndIndexNonASCII,1,326,326,326,0,326
334,InsertCharacterStartIndex,1,1531,1531,1531,0,1531
335,InsertCharacterStartIndexNonASCII,1,770,770,770,0,770
336,InsertCharacterTowardsEndIndex,1,1007,1007,1007,0,1007
337,InsertCharacterTowardsEndIndexNonASCII,1,689,689,689,0,689

Total performance tests executed: 6
Here I run the 6 benchmarks that I wrote in InsertCharacter.swift.
Create a PR
After completing your changes it’s time to push them to your fork. After that is done, you can then open a PR in the Swift repo by following the code of conduct and reading the contributing guidelines. A member of the Swift team will then review and give advices on how to improve your changes even more. In my case, the PR was first approved but the merge failed due to some unrelated tests failing on Jenkins. Another member of the Swift team later reviewed the changes and noticed some possible improvements that could be made. After pushing the new improvements, the PR was approved and immediately merged! 🚢
 Ship it!
Conclusion
If you’re looking to learn more about the internals of Swift and you’re up for some new challenges, you should definitely start taking a look at the Swift repo and starter bugs. Starting with the benchmark suite is a good opportunity to contribute to the project if you don’t have knowledge about C++ (like myself). Don’t be scared about the size of the project and the many different unknown components. The Swift team is very nice and kind and every contributor is always welcome to the project. Give it a try!
Feel free to tweet me with any questions or comments. 👍
Big thanks to Michael Ilseman for the help throughout this project, to Alexsander Akers and Max Bäumle for proofreading the article.